
A tripod and the world to 'time-lapse'
If you haven't yet dared to make your own time lapse here we explain how to do it without complications using any camera, even the one on your phone. The first thing to be clear about is that the raw material for the invention is photographs taken during a more or less long period of time, usually using a tripod so the point of view doesn't change. By mounting them in video form, we obtain a footage that synthesizes in a few seconds or minutes what has happened in front of the camera for much longer. To help you understand it better, we have created an example video. In it we can see 48 minutes of time summarized in 20 seconds.
What camera do I use? When choosing the team to create the time lapse Ideally, use a reflex camera . With it we will achieve images of a quality superior to that of a compact camera or a mobile. Especially if we take the shots at night, because in low light is when the differences are most noticeable. As there are few SLR machines that allow you to program the time interval between shots, you have to resort to using an external accessory: the intervalometer . A device that can be obtained from about 20 euros. Of course, before launching to buy anything, consult the instruction manual of your camera to know if you need it or not.
If we choose to use a compact camera you have to make sure that your internal software has the function of intervalometer, although there are very few cameras that incorporate it (among those that have it are some of the Ricoh brand). The disadvantage of compact cameras is that it is very difficult to use an external interval meter like the ones on SLRs. That is why it is important that you make sure that yours can program the shots.
The third option is to use the camera of a iPhone or that of a telephone with Android or Windows Phone operating system. This is undoubtedly the best option for those who want to travel light. In the app stores Manzana, Google Y microsoft there are many to create videos with time lapse technique . Some allow us to take shots with the time intervals that we establish, but others even allow us to obtain the final video without having to assemble the photos with the computer. The main drawback of using a phone is the image quality it provides, less than that of a real camera. If you work in daylight you won't notice too much difference.
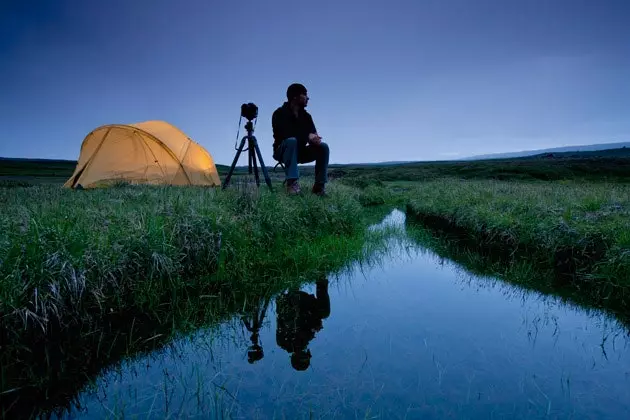
Another thing to keep in mind when creating a time lapse you need a tripod. If you are one of those who prefer to capture different points of view, it is best to opt for a flexible one like the ones from GorillaPod, which can be hooked to almost anything. Whichever you choose, the most important thing is that it has enough solidity to prevent the camera from moving. If you use a mobile, you will need a special tripod for the device. The good news is that you will surely find it in any bazaar for everything for one euro. If not, you can always order one at Deal Extreme, a store that, in addition to having ridiculous prices for that kind of junk, offers free shipping.
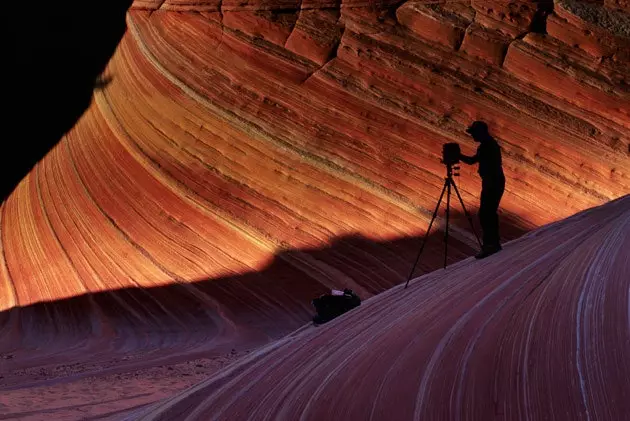
The movement of the sun can be the best resource for time-lapses
How do I plan shots? It is best to frame using a photo format identical to the video format that we will use. This way we will avoid having to cut the photos on the computer. Almost all cameras have a shooting mode for photography with the same resolution as Full HD video: 1920x1080 pixels . That is the one we must choose when adjusting the size of the images that we will capture. If we don't want the clip to take too long to encode and upload to the internet, we can choose adjust photos to 1280x720 pixels . Thus, we will obtain a lighter standard HD video.
Once this adjustment has been made, it is time to frame accurately by placing the camera on the tripod. We have to think about whether or not during the time we will take the shots we will have to move the camera for any reason. If so, find another location. The next thing is to determine the rate of fire. You should keep in mind that to achieve a single second of smooth video image you need 24 to 30 photos . The count is simple: if you shoot a photo every two seconds, you will have about a second of video time for every minute.
That period of time is adequate for dynamic scenes , such as capturing the movement of a busy street. But if you want to capture, for example, the movement of the stars in the sky for a whole night, you should choose to shoot with a higher cadence (one photo every 30 seconds, for example). However, there is no magic recipe. The best thing to do before embarking on an ambitious time-lapse is to do many tests.
You should also keep in mind that the most important thing is that the focus does not change during shot and shot. Calculate the focus for the first photo you take, then move on to manual focus mode . If you use a mobile, you will not be able to do something like that, but you can choose to focus at infinity. That way you will get a uniform result in all shots.
How do I get the final video? Once you have taken all the photos, it is time to assemble them on the computer in the form of the final video. For that, the first thing you should do is download them from the memory card and save them in a folder on your computer. Make a sieve first: surely, you have to discard some of the first and last if we have moved the camera when starting or finishing the process of capturing shots.
The assembly can be done with numerous programs, but the best thing is that in your first steps you do not complicate your life. If you use a Windows PC you can use Movie Maker , the default software that almost always comes with the Microsoft operating system. In the event that you do not have it installed on your computer, you can download it for free on its official website. With it on our computer we will only have to follow the steps that Arturo Goga tells us in the following explanatory video to make a time-lapse. It is a fairly simple process.
Stop Motion Tutorial from arturogoga on Vimeo .
In case you are a user of Mac We offer you an even easier option. If you use the free program Time Lapse Assembler, all you have to do is select the folder where the photos of your time lapse (must contain only those) , set the 'framerate' -the speed of the frames for each second of time in video- in 24, 25 or 30fps , and not modify the size of the images -if we have captured them with the sizes that we already saw at the time-. Now just press the button encode to obtain the final video encoded in h.264 format.
The only drawback of this program is that, unlike Movie Maker , does not allow us to put a soundtrack to our time-lapse. That's something you can do by uploading it to Youtube by choosing some of the 1,500 musical themes that the platform makes available to its users, once the video has been published. If you prefer to give it a more personal touch, then you should use a video editor to add sound to your time lapse . The easiest option for Mac is iMovie.
Now all you need to do is get down to work and follow our advice. We would be quite excited if, if you decide to make your own time-lapse, you would share it with us on Facebook. Don't forget to ask if after reading this little guide you still have questions. We will try to clear them.